Since Saturday evening we have had close to 2.5 inches of much-needed rainfall. This would be the most rain from one system since sometime last summer. It has been very dry with below normal precipitation for well over a year now. The water level in our farm pond provides a pretty good indicator of groundwater levels. It is fed by two springs which flow well and keep the pond full when groundwater levels are normal from consistent precipitation. When precipitation levels are below normal for extended periods of time, such as over the course of several months, the spring flow diminishes and the soil in and around the pond tends to absorb water from the pond. During those times, the water level in the pond will drop.
When we first purchased this farm in the summer of 2005, this part of Virginia had been experiencing normal and above normal rainfall for a couple of years previous to this time and the pond was full.
By the spring of 2007, precipitation had more below normal than above normal months, but the pond was still full enough to do some paddleboating. In the first picture you can see a measuring bar which indicates the position of the pond drain plug about 8 feet below the top of the bar. The other picture shows the overflow drain which would be the maximum depth the pond could reach.
The spring and summer of 2007 saw very little precipitation and the area entered into a drought classification according to the United States National Drought Monitor. By late summer, the pond level was almost to the bottom of the measuring bar. The picture below shows almost the entire length of the measuring bar exposed. The overflow drain is well up the bank on the right side of the photo. That is quite a contrast to the pictures above showing the relative water level to these structures.
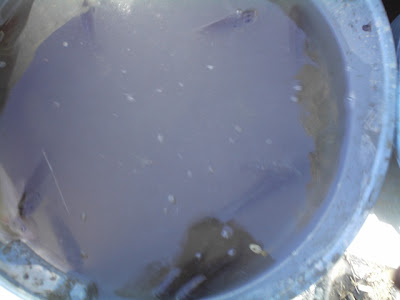
Unfortunately we had chosen the fall of 2006 and spring of 2007 to stock our pond with several hundred game fish. However, by late summer, with the pond level so low, we had to remove as many of the fish as we could to a friend's pond whose water level was faring better than ours during the drought. There was nothing in the long range weather forecasts to indicate a weather pattern shift that would alleviate the drought conditions. If the fish weren't moved to deeper water they would die from oxygen starvation. Using a cast net we caught as many fish as we could and put them in 55 gallon trash cans filled with fresh water for the journey to their new home. We estimated about 800 fish were rounded up and transferred during our 'fish rodeo'.
The pond level fluctuated at or around this level since last summer. Sometimes it would drop even further below this level and then come back up after one of our infrequent rain or frozen precipitation events. However, this last round of rain since Saturday night has seen the water level rise to its highest level in quite some time.
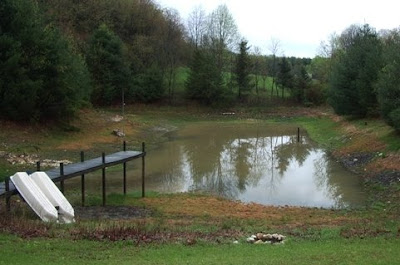
Although the pond still has a ways to go before we can get the paddleboat afloat again.
The spring is flowing nicely today. During the past several months, its flow had slowed to just a trickle.
Monday, April 28, 2008
Thursday, April 17, 2008
How Does Your Garden Grow?
We usually think of garden growth in the vertical sense. Plants grow taller as the season progresses. This spring, as we began to plan the garden contents, it was quickly realized that we were going to need more garden space. So in this case we needed our garden to grow horizontally in terms of length and width to accomodate our plans.
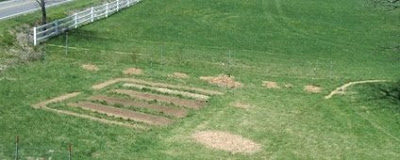
Here is a recent view of the garden area showing the garden bed layout we used last year along with the row of fruit trees that we planted last week.
The layout consisted of 4 raised beds that were 4 feet wide wide by 16 feet long. These beds were used for annual vegetables with the exception of the far bed which is planted with strawberries, and garlics that were wintered over. Around the 4 raised beds was a concentric 2 foot wide raised bed that was used to plant beneficial flowers such as sunflowers and marigolds.
Since we have the space, we decided to mirror the configuration which will double the garden size. To carve new garden beds from the pasture, we use our BCS tiller in several passes. First we run it with a shallow depth setting for the tiller tines to break the sod apart. Then we run the tiller with the tines at the deepest setting to get a nice deep bed dug.
The picture above shows our BCS tiller. The BCS is a multi-purpose device called a walk-behind tractor. It consists of a tractor, which is the engine, transmission, and steering mechanisms, with a power take-off (PTO) attachment to which a multitude of implements, such as a rototiller can be operated. It is the same concept as a typical four-wheeled farm tractor which contains a three-point hitch and PTO for attaching and operating a wide variety of power implements. The walk-behind tractor is a much scaled down version of the same machinery in terms of size and cost. But it is the right size tool for most jobs on our 10 acre farm. I will try to dedicate a future post to the multi-purpose BCS.
The rototiller attachment for the BCS operates better than most dedicated rototillers. The tiller tines rotate at a higher rate than standard tillers, which provides more thorough tilling of the soil. After a couple passes with a shallow tine depth followed by a couple passes with a deeper tine depth, a swath of pasture sod is transformed into a beautiful loam.
Pasture sod is pretty thick and it takes a strong machine to transform the sod to garden soil. Just to show the strength of this tiller, here is what happened to a piece of rebar that was buried in the grass where I was trying to till.
Fortunately, the tines themselves are very tough as they did not appear to sustain any noticeable damage from this incident.
Once the beds were tilled, well rotted mule manure that has been composting over the winter was heaped onto the freshly tilled soil. We will leave the manure in place for a couple of weeks to allow it dry out somewhat and to allow the manure nutrients to fertilize the underlying soil. The composted manure has the consistency of clay, so attempting to till it into the soil until it has had a chance to dry would just clog up the tiller. Here is the manure pile before we started piling it onto the beds:
...and here is what was left after shoveling many, many wheelbarrow loads onto the new garden beds:
By amending the soil with such a significant amount of manure, the volume of the soil in the garden beds will obviously have to increase. Thus the end product will be raised beds of very rich soil. As the summer progresses we will have to provide some updates of how well the vegetables grow in these newly developed garden beds.
Cold Snap Passes
So far it appears that we made it through this latest cold snap with minimal damage. This morning we were just above freezing, but below freezing for the previous three mornings. Wednesday morning was the coldest with a low of 24. However each day it warmed quickly so the new plants and the new fruit trees were not in the freezing temperatures for extended periods of time. It appears that some of the blossoms on the new peach trees that we planted last week may have sustained some damage, but the apple trees and the other plants initially seem to have weathered the cold.
Monday, April 14, 2008
April (Snow) Showers bring....
Remember the old saying that 'April showers bring May flowers'? That one came to mind today as I watched intermittent snow showers pass through the farm today. I don't think that is the type of shower that the inventor of that saying had in mind, but we are not going to complain as we will take all the moisture we can get. The temperature just made it to 40 this afternoon and it is supposed to get below freezing tonight. Hopefully the overnight cold will not damage any of the blooms or garden plants that are starting to poke through the surface of the soil. By Wednesday and into Thursday this little cold snap is scheduled to pass with a return to spring-like temperatures. The little chicks in the brooder seem to be managing fine. It is a little colder in their brooder than I would like, but they all have a pretty good layer of feathers developing on their wings and backs, so individually they can handle the cold better. They are also all getting larger in size, so that when they huddle together to sleep, they have more collective body warmth to share. I tried to capture a picture today showing streaks of snow in the air, but it is pretty tough to tell from this shot. It does give an idea of the gray sky and overall raw feeling that we experienced all day today. That color provides quite a contrast to the bright green colors that are enveloping the local hay fields.
Thursday, April 10, 2008
Fruits for our Labors
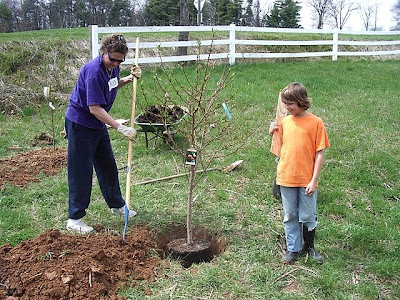
Yesterday's project du jour was to add six new fruit trees to our garden area. If all goes well, in another couple of years we will be harvesting home grown peaches and apples from these trees. We purchased 3 each of peaches and apples, making sure to purchase varieties that pollinate each other by producing blooms at the same time in the spring.
In our garden area, we decided to locate the new trees along the northern edge of the garden area. That way when the trees get bigger, they will not be shading the garden beds. In this picture, the end of the white fence at the far left is the northeast corner of our property. We planned the row of fruit trees to run just inside the northern edge of our property on a line that runs east-to-west.
For each tree we dug a deep enough hole so that we could fill the bottom with well rotted mule manure and then a shallow layer of dirt. On top of that we set the root ball so that the graft line of the tree was going to be about 3 inches above ground level. Once the height was adjusted properly, dirt was filled in around the root ball.
Once the trees were set in place, a layer of mulch was placed around the tree base and ridged up around the perimeter to form a bowl shape. This will help retain and direct water towards the tree base. This shot is looking due north.
This shot is taken from the western edge of the property and looking due east. Around the perimeter of the tree row we put up temporary deer fencing to discourage them from browsing our brand new trees. The deer fencing uses extra long metal T-posts around the perimeter with electric polytape at four different heights from top to bottom. We have portable charger hooked up to charge the lines in excess of 5,000 volts. Hopefully that will discourage the deer from further investigating what is beyond the fence wires. On the list of near term farm projects is permanent deer fencing around the entire perimeter of the garden area, so hopefully this temporary deer fencing will keep them at bay until the permanent fencing is complete.
This shot is looking to the west up the line of newly planted fruit trees. From east-to-west, or front-to-back as you look at this picture are a Fuji, Gala, and Granny Smith apple tree, followed by two Elberta and a Hale-haven peach tree. From the time we got the trees home to the completion of the project was about 4 hours of planting and fence construction time with two people.
Tuesday, April 8, 2008
Eight day old chicks
The baby chicks that arrived last week are growing fast. They are now eight days old and their wing and tail feathers are filling in nicely. Their physical size increase is becoming noticeable.
The chicks live in a 4 foot square brooder pen that we have located in a shed adjacent to our house. Although the shed itself is not heated, the pen is heated using two 250 watt heat lamps. The pen is insulated on all four sides and partially on the top to retain the heat. It has been cold and damp every day since the chicks arrived, but the floor of the brooder has remained right around 90 degrees Fahrenheit which is a good temperature for the chicks. As they get older and stronger we will gradually raise the heat lamps which will lower the temperature to harden the birds for their eventual transition to the outdoors. The top of the brooder pen is hinged to provide easy access to the interior. The floor is covered by a layer of pine shavings. Here is what the setup looks like.
Last year, our first for raising chickens, we kept the brooder pen in our basement. But we found that as the chicks got bigger, so did the smell and the dust. It is amazing how much dust chickens can generate from their constant scratching activity. So this year we decided to try them out in the shed. So far, so good. We lost a chick the first day, but the rest seem to be doing well, knock on wood. More updates to follow.
Thursday, April 3, 2008
Spring Chickens
Yesterday heralded another rite of Spring on our farm; the arrival of this year’s first batch of baby chicks. Thirty-five Rhode Island Red chicks completed their journey from Privett Hatchery in New Mexico to our home in Floyd County, Virginia. We ordered 35, but counted 38 that were shipped to us. Hatcheries will often send an extra couple of chicks to account for mortality amounts common with baby chicks which is usually a couple per shipment. This batch of chicks is supposed to be all females; they are destined to increase the size of our egg laying flock. Although the hatcheries are experts at sexing baby chicks, it is not uncommon for one or two of the opposite gender to find their way into a batch. That is the other reason that a couple extra chicks are provided with the shipment. As these chicks mature, we will be able to determine any males who will be destined for the freezer once they reach butchering size.
Our present egg laying flock consists of eleven Rhode Island Red hens that are just over one year old now. They are raised on the pasture and produce a large brown egg with a golden yolk that is much richer, and more flavorful, than any white egg purchased from the supermarket. Once folks, including ourselves, taste the fresh eggs produced by free ranged local hens, it is undesirable to go back to the supermarket variety produced in egg factories in which the hens live their lives in a cage, never seeing the light of day or a blade of grass.
We have found that there is more demand for the eggs produced by our current flock than the hens can possibly supply. And that is only through word of mouth without even trying to market them. So we thought this year we would expand the egg laying flock size by three times the amount of birds to see how well that will respond to egg demand. Here are some pictures of the recent acquisitions. They are pretty cute at this stage and really quite entertaining to watch as they skitter around the brooder pen.
Once these birds outgrow the brooder and start their lives on pasture, we will look at acquiring one or more batches of meat birds which are raised exclusively for butchering. I would hope to write more about raising meat birds in future posts. For now we will concentrate on raising these egg layers and keeping you updated on their progress.
One final note: unfortunately we lost one chick late last night. She never really seemed to gain use of her legs and was unable to walk to the feeder or waterer. She would just kind of drag herself around. Finally last night I went to check on the chicks and she had given up the fight.
Wednesday, April 2, 2008
Spring Feeling
Today felt like spring in so many ways. It really hit me this afternoon when the sounds and smells came down the hill from our next door neighbor mowing his yard for the first time this year. It was a sixty degree, pleasant, sunny afternoon. The hum of his mower enhanced by the aroma of fresh cut grass really promoted the spring-like mood.
In our own yard, spring activities abounded as well. Pansies were planted in the flower beds.
...and the garden beds were tilled in preparation for cool weather vegetable plantings.
Lettuce, Spinach, Onions, Potatoes, and Broccoli seeds were sown into the freshly tilled earth. Tomorrow's forecast is for temperatures to barely reach 40 with rain, and possibly even some frozen precipitation to remind us that we are still transitioning from winter into spring. But any precipitation is welcome news right now. We have had below normal precipitation for well over a year now and so we will take all that we can get. With rain events being few and far between, we try to plan our farm chores to take advantage of forecasted precipitation like we did today.
Subscribe to:
Posts (Atom)